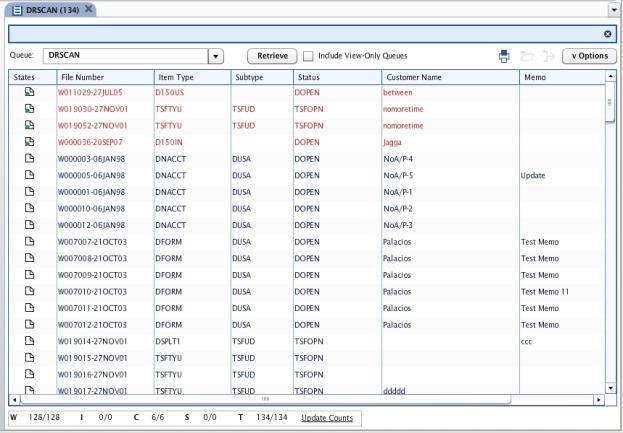
Work list rules let you change the work list to display a different set of fields in the order that you choose. When an operator accesses a work list, XTRAC displays the list using a default set of fields in the following order: File Number, Item Type, Subtype, Status, Customer Name, and Memo.
Note: For XTRAC to display the work list for a queue group in XTRAC Workbench, the work list rule should have the queue group in the work list rule condition. A work list in XTRAC Workbench displays as follows:
Using work list rules, you can set up special work lists for the following components:
When an operator accesses a work list for a queue, XTRAC searches through the current working node for any work list rules that apply. When an operator accesses a work list for a queue group, XTRAC searches through the current entitlement set of the logged in operator for the work list rules that apply. XTRAC uses the first rule it finds that matches. If no rules apply, XTRAC uses a default work list configuration.
To see how operators access work lists, see the XTRAC Workbench User Guide.
IMPORTANT: For general XTRAC rule information, see XTRAC Rules.
Note: To define a work list rule, you need the Create and Work List Rule security functions as part of the security group that is associated with your entitlement set.
To create a node-based work list rule
See Rule Conditions and Building a Rule ConditionBuilding a Rule Condition
You can choose a maximum of 30 fields.
To remove a field, select the field, and then click Remove.
XTRAC saves the rule, numbers it, and appends it to the bottom of the list on the Work List Rule Summary window.
See Ordering Rules
See Using Rules Stored at Another Node.
Note: To define a work list rule, you need the Create and Work List Rule security functions as part of the security group that is associated with your entitlement set.
Centralized rules work only with queue groups.
To create a centralized work list rule
See Rule Conditions and Building a Rule Condition.
You can add a maximum of 30 fields.
To remove a field, select the field, and then click Remove
XTRAC saves the rule, numbers it, and appends it to the bottom of the list on the Work List Rule Summary window.
See Ordering Rules
Copyright © 2011-2014 XTRAC, LLC. All rights reserved.